
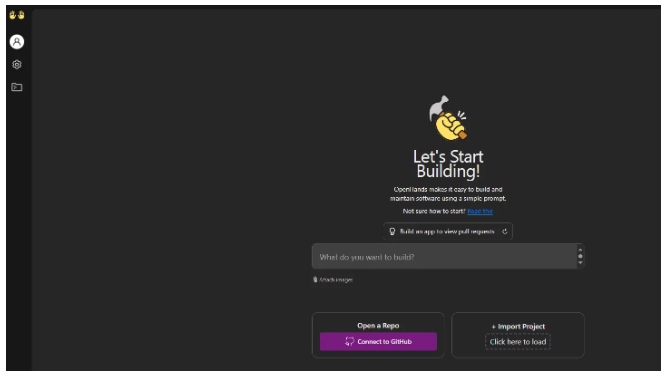
Introducing Openhands

What is openhands AI
OpenHands is a versatile tool that assists engineers with a wide range of tasks, enhancing modern software development workflows. Although it is still evolving and requires user guidance for complex projects, OpenHands excels in handling specific, manageable assignments effectively.
Key Capabilities:
Building from Scratch: Ideal for greenfield projects, OpenHands can initiate new applications, and progressively add features while maintaining control through regular commits.
Enhancing Existing Codebases: It can introduce new functionalities, such as adding GitHub actions for linting or creating new routes and components, by providing clear and specific instructions.
Refactoring: OpenHands efficiently improves code structure by renaming variables, splitting functions, or breaking down large files, enhancing readability and maintainability.
Bug Fixing: It assists in diagnosing and resolving bugs using test-driven development, writing tests to reproduce issues and modifying code to fix them.
Install openhands
To get started with OpenHands, follow the installation instructions provided here. Below is a quick guide to installing OpenHands using Docker.
Step-by-Step Docker Installation Guide
1-Switch to Root User
I tried to start it without root but I got an error, but it works when switching to root
sudo su 2-Set Environment Variables Configure the necessary environment variables:
export WORKSPACE_BASE=$(pwd)/workspace
export LLM_MODEL="anthropic/claude-3-5-sonnet-20240620"
export LLM_API_KEY="$Anthropic_API_KEY"3-Run OpenHands with Docker Execute the following Docker command to start OpenHands:
docker run -it \
    -e SANDBOX_RUNTIME_CONTAINER_IMAGE=ghcr.io/all-hands-ai/runtime:0.10-nikolaik \
    -e SANDBOX_USER_ID=$(id -u) \
    -e WORKSPACE_MOUNT_PATH=$WORKSPACE_BASE \
	-e LLM_API_KEY=$LLM_API_KEY \
	-e LLM_MODEL=$LLM_MODEL \
    -v $WORKSPACE_BASE:/opt/workspace_base \
    -v /var/run/docker.sock:/var/run/docker.sock \
    -p 3000:3000 \
    --add-host host.docker.internal:host-gateway \
    --name openhands-app-$(date +%Y%m%d%H%M%S) \
    ghcr.io/all-hands-ai/openhands:0.10
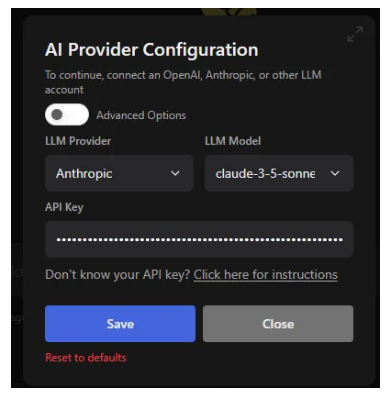
4-Configure OpenHands After installation, you can modify configurations by navigating to the settings within the OpenHands interface.
Changing the LLM Configuration
To change the Language Learning Model (LLM), access the settings in OpenHands and update the LLM_MODEL and LLM_API_KEY variables as needed.
Build you first application
OpenHands simplifies the process of building applications. Follow the steps below to create your first FastAPI application.
1. Generate the Application
Use the following prompt to instruct OpenHands to build a FastAPI application with two endpoints:
Build a FastAPI with two endpoints:

GET /hello: Returns JSON { "message": "Hello, World!" }.

POST /hello: Accepts JSON { "name": "string" } and responds with { "message": "Hello, {name}!" }.
2. Review the Generated main.py
OpenHands will produce a main.py file containing the defined endpoints:
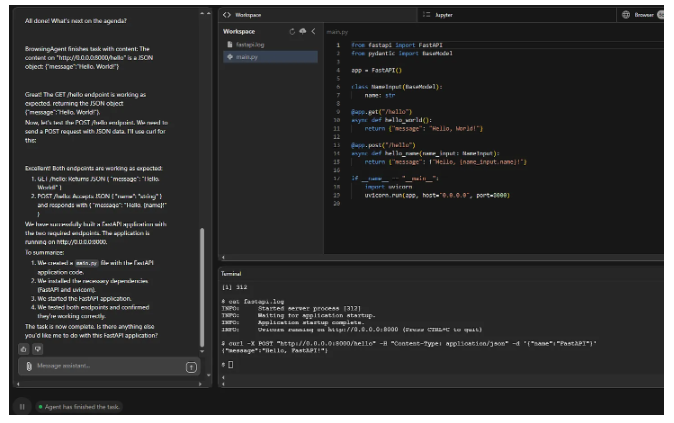
The produced file main.py
from fastapi import FastAPI
from pydantic import BaseModel

app = FastAPI()

class NameInput(BaseModel):
    name: str

@app.get("/hello")
async def hello_world():
    return {"message": "Hello, World!"}

@app.post("/hello")
async def hello_name(name_input: NameInput):
    return {"message": f"Hello, {name_input.name}!"}

if __name__ == "__main__":
    import uvicorn
    uvicorn.run(app, host="0.0.0.0", port=8000)
3. Testing the Endpoints
OpenHands agents test the endpoints to ensure functionality:
GET /hello: Tested using the BrowsingAgent.
POST /hello: Tested using the
curlcommand, with results visible at the bottom of the screen.

4. Create a Dockerfile
dockerize the application
Use the prompt below to have OpenHands generate a Dockerfile:
Build a Dockerfile for a FastAPI application:

Use Python 3.12 as the base image.
Set the working directory to /app.
Copy the requirements.txt and install dependencies using pip.
Copy the entire FastAPI project into /app.
Expose port 8000.
Run the app using uvicorn with auto-reload enabled.
Also you can ask the agent to give you the instructions on how to build the docker image and how to run, by using the following prompt
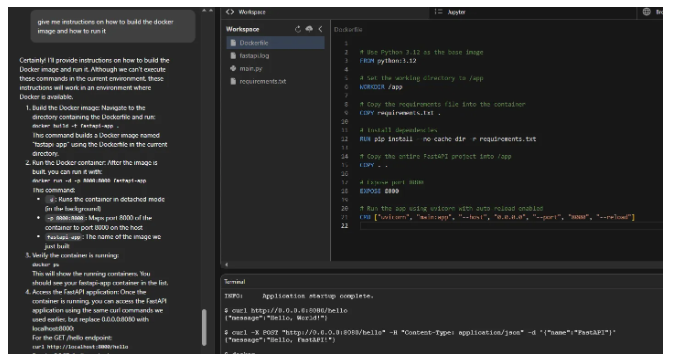
5. Build and Run the Docker Image
By using the ouptut from the agent we can now build the image, run it, then test it on our machine.
#build the image
docker build -t fastapi-app .

#Run the image
docker run -d -p 8000:8000 fastapi-app

#Test the GET endpoint
curl http://localhost:8000/hello

#Test the POST endpoint
curl -X POST "http://localhost:8000/hello" -H "Content-Type: application/json" -d '{"name":"FastAPI"}'
Connecting to Your GitHub Repository
Integrate OpenHands with your GitHub repository to streamline your development workflow.
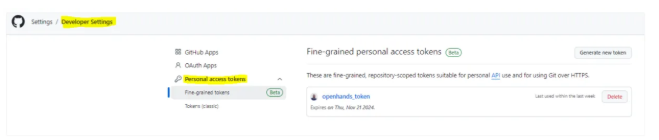
1. Generate a Github personal access token
you need to generate a personal access token that has access to your github account, for this demo I have used the fine-grained personal access tokens
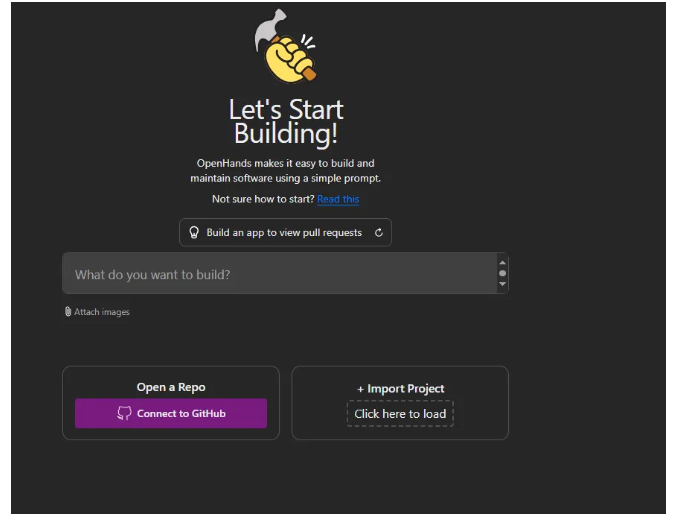
2. Connect to GitHub
From the OpenHands home page, click on Connect to GitHub.
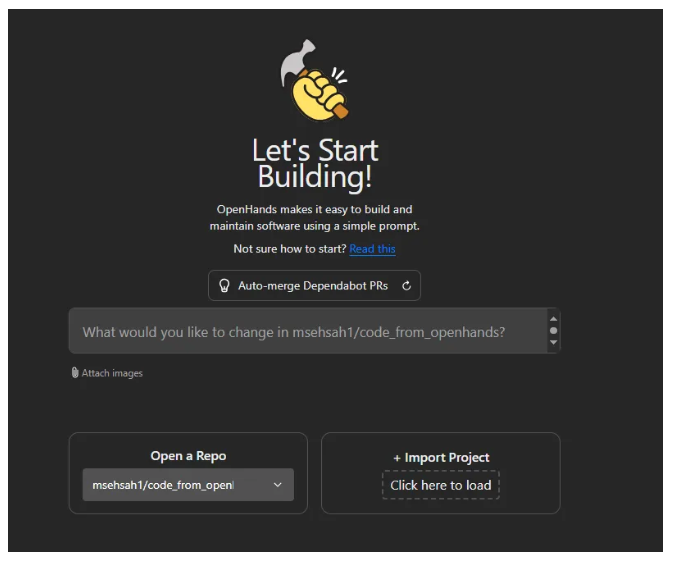
3. Select Your Repository
After connecting your GitHub account, select the repository you wish to work with.
4.Instruct OpenHands to Perform a Task
For example, use the following prompt to generate a Dockerfile and set up your FastAPI application:
Generate a Dockerfile that uses Python 3.12 as the base image and sets up a FastAPI application. The Dockerfile should do the following:
Use python:3.12 as the base image.
Set up a working directory inside the container.
Install the FastAPI framework and uvicorn for running the FastAPI app.
Copy the requirements file and install the dependencies using pip.
Expose port 8000, which is commonly used for FastAPI applications.
Use uvicorn to start the FastAPI application, specifying the app module and the main function to run the server.
5. Publish to GitHub
After OpenHands completes the code generation:
Click on the Publish to GitHub button.
OpenHands will automatically generate and execute the following prompt:
Let's push the code to GitHub.
If we're currently on the openhands-workspace branch, please create a new branch with a descriptive name.
Commit any changes and push them to the remote repository.
Finally, open up a pull request using the GitHub API and the token in the GITHUB_TOKEN environment variable, then show me the URL of the pull request.

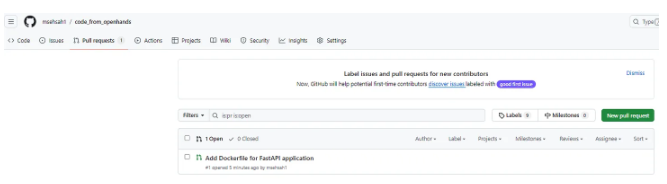
5. Review the Pull Request
Navigate to your GitHub repository to review the newly created pull request, ensuring that all changes have been correctly applied.
Other Ways to Interact with OpenHands
OpenHands offers multiple interaction modes to suit different workflows and preferences:
CLI Mode : https://docs.all-hands.dev/modules/usage/how-to/cli-mode
Headless Mode : https://docs.all-hands.dev/modules/usage/how-to/headless-mode
Github actions : https://docs.all-hands.dev/modules/usage/how-to/github-action
Conclusion
OpenHands AI is an indispensable tool for modern software engineers, offering robust capabilities to build, enhance, refactor, and debug applications efficiently. Its seamless integration with tools like Docker and GitHub, combined with versatile interaction modes, makes it a valuable addition to any development workflow.