


Getting Started with skypilot

What is Skypilot
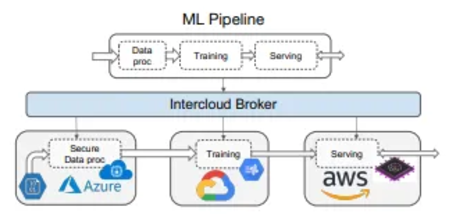
SkyPilot is an open-source project designed to simplify and optimize the process of deploying machine learning (ML) and other compute-intensive workloads across various cloud platforms. The goal of SkyPilot is to provide a user-friendly interface that abstracts away the complexities involved in managing resources across different cloud providers, enabling users and organizations to focus on their core tasks without worrying about the underlying infrastructure.
Prerequisite Preparation
OS
The operating system version used in this tutorial is ubuntu 20.04.6 LTS
Installing conda
Conda is an open-source package management and environment management system which is a part of the Anaconda distribution.
https://docs.conda.io/projects/miniconda/en/latest/
#Create Installation Directory
mkdir -p ~/miniconda3

# Download Miniconda Installer
wget https://repo.anaconda.com/miniconda/Miniconda3-latest-Linux-x86_64.sh -O ~/miniconda3/miniconda.sh

#Run Installer Script
bash ~/miniconda3/miniconda.sh -b -u -p ~/miniconda3

#Cleanup Installation Script
rm -rf ~/miniconda3/miniconda.sh

#Initialize Conda
~/miniconda3/bin/conda init bash

#Verify Installation
conda --version
Start by creating a new environment specifically for SkyPilot. This ensures that its dependencies do not interfere with other Python packages on your system.
conda create -y -n sky python=3.10
conda activate sky
With the environment activated, use pip to install SkyPilot. If you are using Google Cloud Platform (GCP), you can include the GCP-specific dependencies as follows:
pip install "skypilot[gcp]"After the installation is complete, you can verify that SkyPilot was installed correctly by running:
sky check
Setting Up GCP Service Account
To interact with GCP services securely, you need to authenticate using a service account. Follow these steps to create a service account, assign the necessary permissions, and generate a JSON key for authentication:
1. Create a Service Account:
Navigate to the IAM & Admin page: Go to the Google Cloud Console, and open the IAM & Admin page.
Open the Service Accounts section: Click on "Service Accounts" in the sidebar.
Create a new service account: Click on “Create Service Account” button at the top of the page.
2. Grant Service Account Permissions
After creating the service account, you'll be prompted to assign roles. Assign the “Owner” role to ensure the service account has sufficient permissions to manage all resources in your project.
3. Generate a JSON Key:
Open the service account: Go back to the Service Accounts page, click on the newly created service account to open its details page.
Create a key: In the “Keys” section, click “Add Key” and choose “Create new key”.
Select JSON key type: Choose JSON as the key type and click “Create”. The JSON key file will be generated and downloaded to your computer.
Secure the key: Store the JSON key file securely, as it allows access to your GCP resources.
To enable SkyPilot to interact with Google Cloud Platform (GCP) resources, it's essential to authenticate it using the service account created in the previous steps. This process involves setting environment variables, and configuring the Google Cloud SDK
1. Install Google Cloud SDK:
Begin by installing the Google Cloud SDK, which provides the necessary tools and libraries to interact with GCP services. Use conda to install it from the conda-forge
conda install -c conda-forge google-cloud-sdk2. Set Environment Variable for the Service Account Key:
export GOOGLE_APPLICATION_CREDENTIALS=/home/mahmoud_rasmy_fathy1_gmail_com/skypilot/key.json3. Activate the Service Account:
gcloud auth activate-service-account --key-file=$GOOGLE_APPLICATION_CREDENTIALS4. Set the Active GCP Project:
gcloud config set project your-project-id5. Verify Authentication
sky check
Run your first job using skypilot
This section will guide you through running your first job using SkyPilot by launching a cluster and executing tasks defined in a YAML configuration file.
1. Create a Cluster Configuration File:
Start by creating a YAML file (e.g., hello_sky.yaml) to define your cluster configuration and job specifications. Below is a basic structure of the configuration file with essential sections:
resources:

# Working directory (optional) containing the project codebase.
# Its contents are synced to ~/sky_workdir/ on the cluster.
workdir: .

# Typical use: pip install -r requirements.txt
# Invoked under the workdir (i.e., can use its files).
setup: |
  echo "Running setup."

# Typical use: make use of resources, such as running training.
run: |
  echo "Hello, SkyPilot!"
  conda env list
This defines a task with the following components:
resources: cloud resources the task must be run on (e.g., accelerators, instance type, etc.)workdir: the working directory containing project code that will be synced to the provisioned instance(s)setup: commands that must be run before the task is executed (invoked under workdir)run: commands that run the actual task (invoked under workdir)
2. Launch the Cluster with SkyPilot:
With your hello_sky.yaml file ready, launch the cluster using the sky launch command. Specify the cluster name (mycluster) and the configuration file:
sky launch -c mycluster hello_sky.yaml
If you encounter a Unix Domain Socket Path Length error, please refer to the solution at the end of this article for guidance on resolving the issue.
3.Checking the Status of Your SkyPilot Cluster
Run the sky status command to get an overview of your cluster's current state:

4.Execute the Job on Your Cluster
With your hello_sky.yaml file ready and your mycluster cluster running, execute your job using the following command:
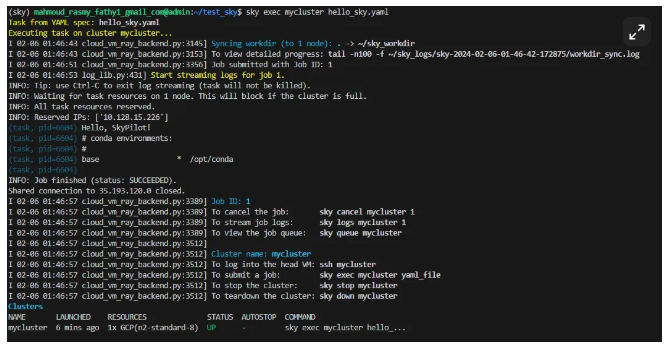
sky exec mycluster hello_sky.yamlThis command tells SkyPilot to execute the job defined in hello_sky.yaml on the mycluster cluster. SkyPilot will synchronize the workdir from your local environment to the cluster and then execute run commands as defined in the YAML file.
5.Stopping Your SkyPilot Cluster
When you're done running jobs, or if you wish to halt operations on your SkyPilot cluster for any reason, you can easily stop the cluster using the sky stop command. Stopping a cluster can help you manage costs and resources effectively, especially in a cloud environment where resources are billed based on usage. Follow these simple steps to stop your cluster:
sky stop mycluster
6.Restarting Your SkyPilot Cluster
If you have previously stopped a SkyPilot cluster and wish to resume operations, you can easily restart the cluster using the sky start command
sky start mycluster7.Deleting Your SkyPilot Cluster
When you no longer need a SkyPilot cluster and want to permanently remove it along with all associated resources, you can use the sky down command.
sky down myclusterResolving Unix Domain Socket Path Length Issue in SkyPilot
When working with SkyPilot, you might encounter an error related to the Unix domain socket path length in the ~/sky_logs. This error occurs when the socket path exceeds the maximum allowed length for Unix domain sockets. Here's a summary of the issue and the steps to resolve it:
Error Description:
Upon examining the log file in ~/sky_logs, you may encounter errors resembling the following:
unix_listener: path "/tmp/skypilot_ssh_username/some_long_string" too long for Unix domain socket
rsync: connection unexpectedly closed (0 bytes received so far) [sender]
rsync error: unexplained error (code 255) at io.c(235) [sender=3.1.3]
...
Resolution Steps:
1.Locate the command_runner file:
Open the command_runner.py file located in your SkyPilot environment. You can find this file at the following path,
/home/your_username/miniconda3/envs/sky/lib/python3.x/site-packages/sky/utils/command_runner.py
2.Modify the _ssh_control_path function:
Substitute the existing _ssh_control_path function in the script with the following function :
def _ssh_control_path(ssh_control_filename: Optional[str]) -> Optional[str]:
    """Returns a temporary path to be used as the ssh control path."""
    if ssh_control_filename is None:
        return None
    base_path = '/tmp/skypilot_ssh_'
    user_hash = common_utils.get_user_hash()
    path = os.path.join(base_path, f'{user_hash}/{ssh_control_filename}')
    os.makedirs(path, exist_ok=True)
    return path